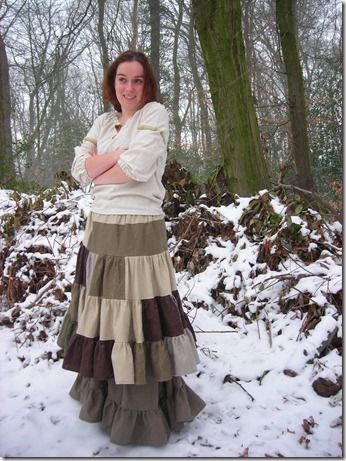
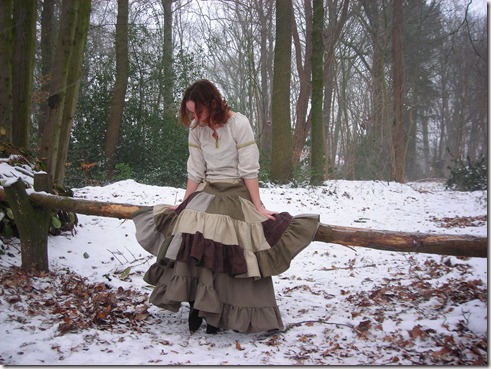
Hello everybody! It has been a while since my last blog post, I have been so busy with the holidays and my internship! at this moment, however, I just feel like blogging again and I have something really nice today: A new tutorial on my werewolf costume! Slowly but steady all the pieces of this costume are coming together and I plan on finishing some more stuff very soon. In this tutorial I will show you the second skirt of this costume. It is the cute patchy overskirt in the drawing I wrote about last year. It will be worn over the underskirt I already made, as can be seen in these pictures (yay for snow, I love it!):
It’s very wide (the bottom tier is more than 9,5 m long!) and flows around your legs with every movement you make. I love this skirt, and if you want to make one too, I will explain how to do so below!
If you want to make a patchy skirt like mine, collect all the little bits of fabric you have left. In principle, you can use every kind of fabric you like, but I personally prefer fabrics that do not stretch. For this skirt I used all the linen remnants from other costumes I still had lying around. If you want your skirt to be in one colour (or maybe a different colour for each tier) you have to calculate how much fabric you need from each colour (I guess that is not too difficult to figure out, let me know if you don’t know how to do it). Then we need:
- bits of fabric (no stretchy stuff)
- matching thread
- lots and lots of pins
- patience

(I had to make this tutorial with drawings instead of photographs, I didn’t have a camera on hand when I was working on this one. Let me know if this is better/worse that the photo tutorials, so I know what to do in the future!)
STEP 1
- First you have to determine the size of your tiers. Measure how long you want your skirt to be, from waist (or hips) to hem, which is your skirt length. For me, that was 80 cm.
- Then determine how much tiers you want. I took 4. You can make a lot more, but realize that the length doubles with every tier you add.
- Divide your skirt length by the number of tiers you want and add 2 cm, this is your tier width.
- For the tier at the top, determine how wide you want you skir to be, measured around the hips. I used 120 cm, so it is already a bit wide on my hips, this is your tier length. Then, for every succeeding tier, double this tier length.
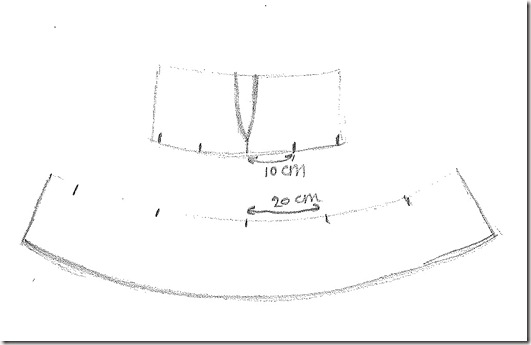
- Then you need four (in my case) rectangles with the sizes indicated in the picture:
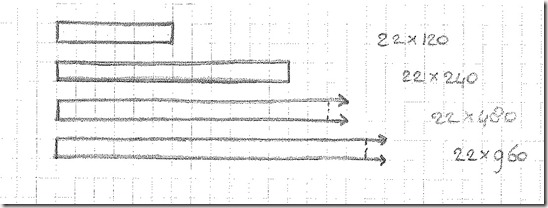 You can cut these from your fabric or stitch small pieces of fabric together until you have the right length, which is what I did (hence the patchy effect).
STEP 2
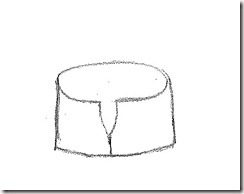
Now stitch the upper tier into a circle. You might want to leave a slit in the back so you can put it on, or, like me, want to put a tail through it!
STEP 3
Stitch the next tier into a circle, making sure you don’t twist it. Then, mark the lower hem of your top tier every 10 cm, and the top edge of your second tier every 20 cm.
STEP 4
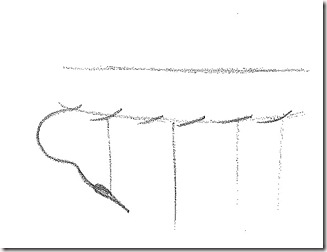
Now this is where the patience comes in: Pin the two tiers together on the markings (right sides together), making small pleats in the lower tier. Now pleat and pin the fabric in between the markings as shown in the picture, working your way all around the skirt. Make sure not to stab yourself along the way, it happens easily and it hurts. Also, if you don’t finish it in one run, put it away safely to keep it from children, boyfriends or any other persons that are not aware of the quite dangerous object that you’ve created. Stitch when finished. Repeat this step for all the other tiers. Are you bored already? I recommend combining this step with a nice movie or two, I watched the first two parts of the extended LOTR movies ![]()
STEP 5
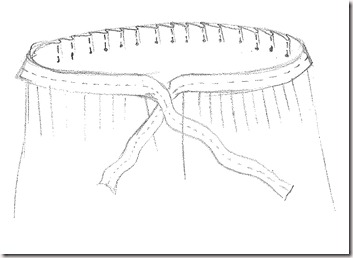
- When you finished your skirt, cut a waistband (mine was 1,5 m long and 8 cm wide), fold it in half and iron it.
- Determine how wide the waist of your skirt has to be (for me: 84 cm), and how wide the upper tier of your skirt is (for me:120 cm). Then divide the upper tier length by the waist length of your skirt (for me: about 15) and mark the upper edge of your skirt every that-much cm, so for me 15 cm.
- Then mark your waistband at the center and mark at intervals of 10 cm to each side. Find the center of your upper skirt edge and pleat the skirt to your waistband, just like you did with the tiers. Stitch the skirt to the waistband.
- Fold the waistband in and stitch in place by hand, then finish the long slips by hand or machine. Hem the lower edge of your skirt and it is finished!
I hope you liked this one! Please let me know if you are going to make one of your own, I would like to see the result! If you have any questions, requests or ideas, plese let me know at janneke.theimaginaryworlds@gmail.com

Love the pictures of you in the snow! We sure live in a pretty place 🙂 to me this tutorial (with drawings) seems easier to understand than the ones with pictures, but I’m a crafting-noob 😛
LikeLike
Pingback: Peasant Skirts - Fit For All Occasions | Design Skirt.com
Beautiful!
LikeLike
Pingback: 48 + Free Skirt Tutorials : frugal and thriving